A few folks have commented on the high quality of my video/audio feed during conference calls. Many have written to ask how I do it. Rather than copying the same list over and over again, I’m capturing it here for future reference.
Disclaimer 1: I expect this setup will continue to evolve, which is why this post’s title is dated. I plan to publish updates on significant upgrades.
Disclaimer 2: The Amazon links below are affiliate links. I get a small commission if you buy after clicking on one of these links.
Onward…
Video
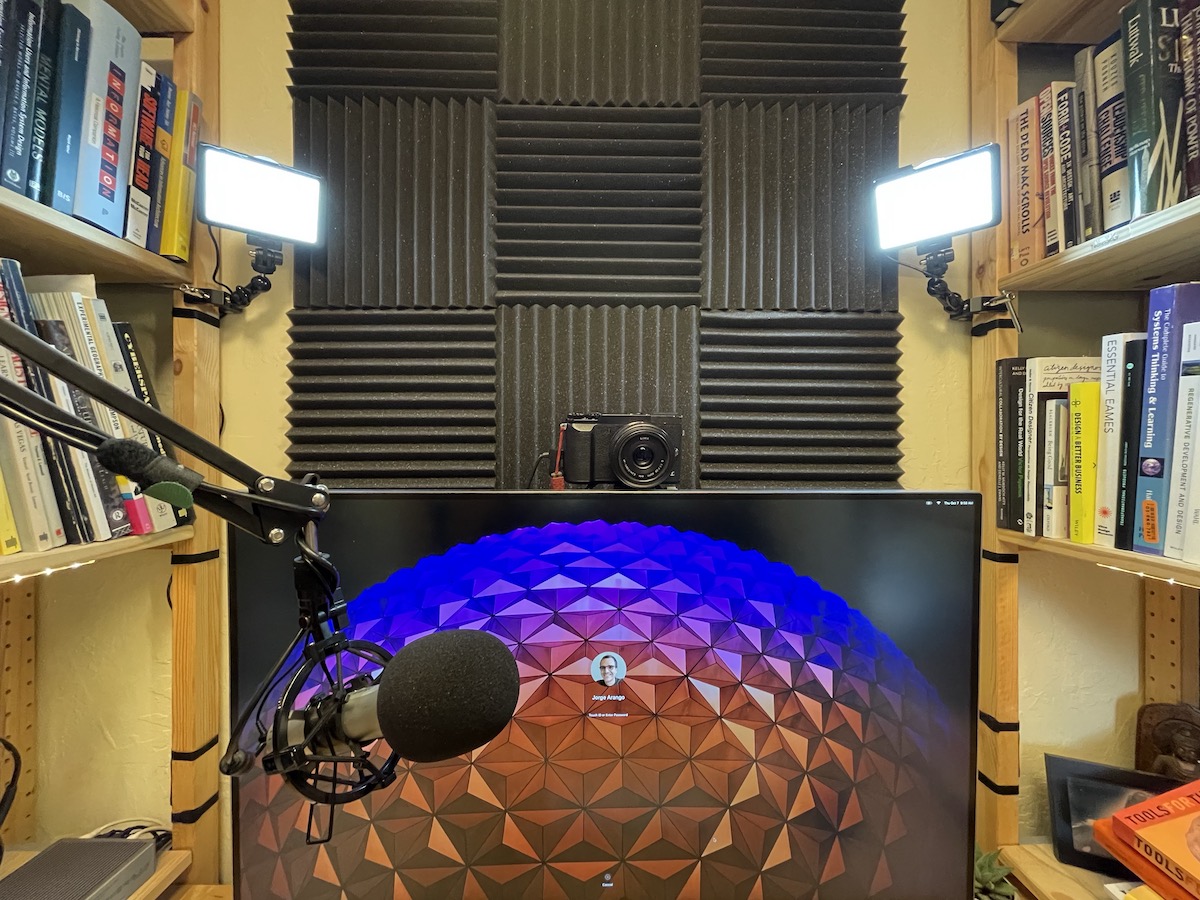
Camera. If we’re in a Zoom call, and you notice my feed looks especially good, it’s because you’re not looking at video from an off-the-shelf webcam. Instead, I use a Panasonic LUMIX GX85 Micro Four Thirds interchangeable lens camera. The “Micro Four Thirds” here refers to the size of the camera’s sensor, which is much larger than those in webcams or phone cameras. Larger sensor = better image.
Lens. But the camera is only part of the package. The other key here is a decent lens. I use a Panasonic 20 mm F1.7, a fast and compact lens that lets in a lot of light and produces a nice blurred background (“bokeh”) without the need for digital filters. I’ve used LUMIX m4/3 cameras for many years, and this small 20 mm lens has been very reliable and taken great pictures. It doesn’t have the fastest autofocus, but that doesn’t matter much for videoconferencing.
Mounting. It’s worth noting that I also use this camera/lens combo for taking pictures. But the iPhone 12 Pro’s cameras are so good that I only take the “real” camera out on rare occasions. Still, I want it to be easy to detach the camera from the display. For this purpose, I use an ULANZI tripod ball head with a quick release mount. This tripod head is connected to a SMALLRIG adjustable arm that connects to my display mount.
HDMI adaptor. You may be wondering how I get the camera’s video into the computer. The answer is the Elgato Cam Link 4K, an adaptor that connects your camera’s HDMI port to your computer’s USB port. The Cam Link appears as a video source in applications like Zoom. When you turn on the camera (and turn off its information overlays), you see its video feed as though it were a webcam.
Powering the camera. Live video eats the camera’s batteries. Fortunately, you can buy an adaptor for the LUMIX camera that has the same size and connector as a regular battery and allows you to power the camera from a regular A/C power socket. (I expect such adaptors exist for other cameras.)
Lighting. The setup I’ve described so far isn’t cheap. And it would be mostly wasted if not for the right lighting. It’s especially important in my case, since I sit in front of a window that shines bright California sunshine straight into the camera’s lens. (I know, this isn’t a good practice, but I must work with the space I have in my house.) The solution is to shine lots of light on your face from behind the camera. I do this with a couple of cheap LED panel lights. I’ve placed one on either side of my display, and turn them on whenever I’m going on a meeting. (I keep them off otherwise, since I don’t like bright light in my eyes all day.)
Audio
Microphone. When videoconferencing, clean audio is as important (or perhaps even more important) than good video. When I started recording The Informed Life podcast, I got an Audio Technica ATR2100-USB microphone, and this is what I use when doing conference calls. (There’s a newer version of this mic that features USB-C, this is what I’d get if I were shopping today.) The internal mics on the M1 MacBook Pro also sound great, but I keep my MacBook closed most of the time it’s connected to the external display. (I.e., when I’m working at my desk.)
Mounting. The microphone is mounted on a cheap mic arm. This allows me to get the mic close to my face when I’m talking, but swing it out of the way when I’m not in a meeting. (I keep the mic out of frame most of the time, which isn’t hard to do with the 20 mm lens’s relatively tight field of view.)
Audio/video sync. This is a weak aspect of this setup: the video and audio feeds can be out of sync. I don’t know the technical details, but there’s latency between the camera’s HDMI feed and the mic’s USB feed. (I could use the camera’s HDMI audio feed, but its internal mics are vastly inferior to the ATR mic.) I’ve tried several solutions for this, including Rogue Amoeba’s Loopback app and adding a delay to the mic feed in OBS (which I use to record video.) But I’m not satisfied with either approach yet.
Speakers. Currently, this is the weakest link in my setup. Currently, my audio comes through the small built-in speaker on my LG display. They’re loud enough, but the quality isn’t good. (The MacBook’s built-in speakers are much better, but as I said, I keep the MBP in clamshell mode when I’m working at my desk.) I could get external speakers, but my office space is relatively small and I don’t want more clutter. (I also use an old Bose QC-15 headset whenever there’s noise in my house or when I’m recording podcasts, since the QC-15s have good noise-cancelling capabilities.)
Acoustic tiles. This is another benefit of doing the podcast. Shortly after I started the show, I realized audio sounded much better if I dampened the room a bit. So, I covered several walls in my office with cheap acoustic tiles. This is an easy way to get much better sound quality — if you don’t mind having your office look like a recording studio.
Conclusion (for now)
I’m happy with my current setup. That said, it’s taken lots of effort and money to get to this point. Some components I already had (e.g., camera, microphone), but I’ve had to buy others. There’s also been lots of experimenting, and time is money. But I think it’s been worth it — especially now that most (if not all) meetings happen over video calls. I hope this list helps if you’re looking to improve the quality of your videoconference feed. Please reach out (email, Twitter) if you have questions or you’ve found things that work better.